Monday, March 21, 2011

Ready at Last - Sails Included

After some 200 hours of toiling for three months and seven days, March 20th was the day on which I finally pronounced my little ship to be seaworthy and good to go.

Phew! No spring fling this little winter project would be!

Also: I am happy to report that the ice on Lake Arthur has vanished. Instead, hundreds of Buffleheads and Mergansers are frolicking on the lake. A great opportunity to do some birding of early migrants, don't you think? This coming week does not look promising but I am keeping my fingers crossed for next weekend.

I had fiddled around with rigging the down-haul but now have a nice arrangement with a double purchase. I may set up a cam cleat on the mast step but that can wait.

It did take me quite a while to figure out an elegant method of attaching the sail to the boom and yard.

John Harris, the designer of the PMD (and owner of CLC), had suggested that these spars would probably be attached in a semi-permanent way much like the sail of a sunfish.

In response to my question, he suggested using the reefing knot where the two ends would be capped with a half-hitch thereby preventing the relatively loose knot to get undone. With an 1/8" line this obviously will work well,  and look pretty tidy.


However, after messing around with the lug sail and spars in my basement for some time, I found that it was impossible to flake the sail nicely with both spars attached.

I wanted therefore to be able to detach sail from yard relatively easily. This would allow me to flake the sail along the still-attached boom and then roll it around the yard for sail-kindly storage. With that objective in mind, the proposed knot would not be convenient. Eventually I came up with a solution that looks quite neat, can easily be undone and seemed practical.

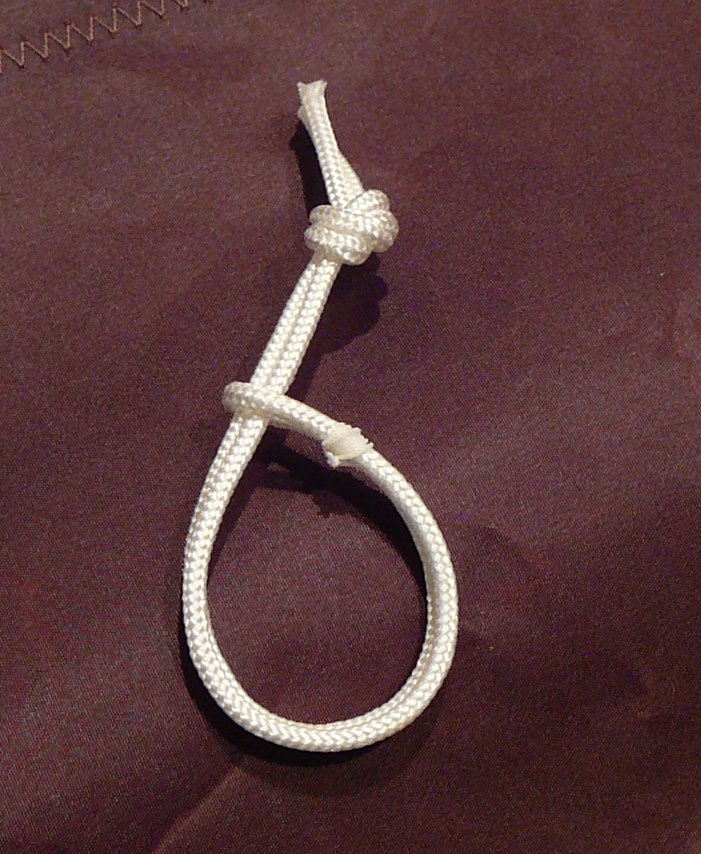
I started with 20" pieces of 1/8" Dacron cord.

 After cutting the pieces, I dipped the ends in Liquid Rope Whipping.

I then folded the line in half and tied some whipping twine as though it were the end of a rope.

The result was a loop in the middle of the line which could be opened and closed by slipping the twine up and down like a quasi-zipper. 

The two ends were then threaded together through the noose...


...and knotted with a twin half hitch.

The Liquid Rope Whipping kept the two ends together quite nicely.

Voila! All that needed to be done now was to "zip up" and pull the double half-hitch toward the noose.

The resulting ring could now easily be opened and closed and slipped through the cringle in the sail and around the spar.

*  *  *

As it turns out, I really only need to open about five rings on the yard - after that, the yard simply slips out of the remaining cord rings.

In part I had complicated my task a bit since I stitched leather around the parts of boom and yard  which intersect with the mast of this balanced lug rig. More on that and other lug rig specific items in a future blog.

*  *  *

Broad-reaching up my driveway - ready for some real action!
So now, all that is left to do is to secure the boat on the trailer for a safe and kindly ride. When I initially place the boat in its trailer bunks, I realized that the boat would tow with more stability, if the skegg would rest on the end roller. So now that this has been corrected, the boat sits firmly on the bunks without rocking.

Ready to launch!

Tuesday, March 15, 2011

Hatch Now - Launch Later

Even though visiting friends had admired the work in progress, I know that deep down they seriously doubted that I'd be able to transport the boat to the outside without tearing down a couple of walls.

Admittedly, as the parts came together the boat looked a lot larger than I had pictured. My friends' raised eye-brows caused me to remeasure the door way more than once.

But I had faith in the instructions which clearly stated the needed minimum dimensions of the exit in order to hatch this little duckling unscathed. Accordingly I should have room to spare.

The final coat was applied to the outside and though there are a couple of minor surface tasks any job here on out can be accomplished with the boat on the trailer.


So, this past Sunday I called up my friendly neighbor and neighborly friend John for a steel-nerved assist.

First we did a dry run and placed a floor mat where we needed to put down the boat in order to step down a small ledge.

Then we hoisted the boat out of its cocoon - cracked the shell, as it were - and slipped it through the door with an amazing amount of room to spare. Wow, that was easier than I thought. THANK YOU, Sir John!

Though the launching date is still some time away, the boat on its new trailer is starting to look rather shippy and salty, don't you think?

As soon as the vessel sat on its bunks, I grabbed the wooden mast to see if and how it fit in the mast step. After all, this was the first time I had sufficient air space to raise the mast. It's an excellent fit. I will craft a little wedge to ensure that the mast has no room to pump.

After I was done admiring the virgin state of my PMD and figuring when and how I would install the hardware, I returned to the sun room / workshop to clean up a bit.

Gosh - I almost felt a bit sad that the main work was finished now and that I would have to relinquish my little workshop to more mundane living.

Anyway, I'm not done yet and besides, soon there will be the fun of sailing or rowing it. I will wait for a reasonably warm day to hoist the sail and to install the horn cleats on the mast and some other arrangement to control the down haul. The kit did not come with anything in regard to the down-haul, so I'll have to draw upon my little sailing bag of tricks.

Next time a word about the lug rig.

Sunday, March 6, 2011

Satin Doll

As I began to think about the final look of my boat, I thought on one hand of the almost museum-quality creations of many fellow PMD builders as evidenced on their blogs and on the PMD Forum. In fact, my own vessel started to look like that after the fourth coat of varnish.

On the other hand, I considered the practical aspect of sailing and found the high gloss appearance not practical for two reasons: (1) I would anticipate that on the first heavy weather day it would scuff and scratch and (2) I thought that the super-smooth gloss would be too slippery with the first splash of water.

I was not even aware of the possibility of a finish other than the high-gloss varnish until I saw this picture which I came across as I was trying to figure out how my lug-rig components was intended to work.

I called CLC and yes, they do have another varnish BUT it does not offer UV protection. Therefore, you have to apply a minimum of three coats of the hi-gloss varnish before you can put on this other stuff.

As most of you know from conversations with your favorite house painters, the opposite of glossy is matte - (and yes, there is the dreaded semi-gloss but never mind that one.)  Not so in varnish terminology. I guess, matte sounds perhaps a bit too dreary for your average shipwright, no?

So, after five coats of high-gloss Schooner varnish...

First coat of Satin - with day light


...I am now applying Interlux Goldspar Satin. This is the varnish which will provide the finished look of the bright work, i.e. the entire inside of the boat as well as the top plank of the outside. I am planning on two coats - with you-know-what in between coats.

The foils will also shine in satin but I am not sure yet whether the mast, yard and boom will receive the same treatment.


Satin coat with artificial light
Instead of a shiny reflection of the high-gloss varnish, I am aiming for the amber glow of Okume wood - from within.

Heck! With enough coats of high gloss varnish you can make almost anything look pretty and sparkly but the sumptuous satin draws the eye below the surface and will only work on something that is worth looking at.


Besides -

this seems to make for a better contrast with the shiny Hatteras White of the lower strakes and rudder head, don't you think?!

Wednesday, March 2, 2011

Zen and the Art of Sanding

They say that 80% of boat building is sanding. Sounds about right to me.

The drone of the orbital (rotary) sander becomes quasi hypnotic. This was less so when I was working on the individual strakes, planks and other components prior to assembling the pram.

But now these components are formed literally into a sound chamber which amplifies the vibrations much like the body of a lute amplifies the oscillations of its strings.

The vibration transferred in the hands last long after the sander is turned off even though I've been working on a "light touch" and wear gloves. Also, I notice that in between coats of varnish the orbital seems to take off more varnish than it should - even at its slowest speed. . What to do?

Switch off the machine and go into manual mode. Okay!

After sanding the fourth coat and wipe off
It'll be slower going but quieter. I might even listen to some music. But wait - its all about focus on the task at hand - being in the moment, you know - concentrate but relax at the same time. So, hold the music.

Mindfulness is what the Buddhist monk, poet and Zen Master Thich Nhat Hanh calls it. In the Jewish Tradition this state of directed consciousness is known as kavanah. Rabbi Aryeh Kaplan explains that kavanah is clearing the mind of extraneous thought and concentrating totally on the action at hand.

A meditation on sanding then... breathe in - breathe out! (BTW: not so easy whilst wearing a breathing apparatus to avoid inhaling the micro-dust.)

With fifth coat of varnish applied
You sand the very same planks over and over again - much like washing dishes - you'll do it again tomorrow. Master Thich Nhat Hand advises: Do not try to hurry to get the job over with. Consider washing the dishes the most important thing in life. - Roger that!

Not much seems different from the last time you did it. You almost have to forget about outcome and simply enjoy the work without some immediate result or completion in mind.

As I sand I don't notice that I am bending my back in awkward ways. But when I stop sanding I ache. Breathe in - breathe out!

As I sand I don't notice that my hand and fingers are gripping the pad a tad too tight. But my finger joints complain about it when I finally rest. Breathe in - breathe out!

As I sand I don't notice that my arm moves more vigorously than might befit my age. But when I stop, my limbs demand that I come to my senses. Breathe in - breathe out!

I almost stopped counting time. I do know that the project tallies well north of 200 hours... but that includes tasks such as building the trailer

What is time when the task is timeless?  And how long exactly is NOW?

Sunday, February 27, 2011

Tow, tow, tow your boat

Alright then!
What will be rowed must first be towed.

Easier said than done.

First off, I had to make a decision: what kind of trailer should I get?

I actually have an old but trusty trailer for my MX-Ray. I am certain that it would work well for the PMD - should I used it? ...but then I AM planning to sell the MX-Ray and it'll be a lot easier to sell with a trailer which I customized to fit this hull like a glove. Besides, it's not exactly pretty  and I feel that a new boat would be a lot happier on a brand new trailer. Okay - that wasn't so hard, was it?

Some discussion about trailers on the PMD Forum provided excellent information.

Ultimately, I opted to buy the trailer that is specifically recommended by Chesapeake Light Craft even though, I have no doubt that a rather less expensive alternative would have done the job just as well.

It was the fact that the Trailex SUT-250-S is an all aluminum product which makes it impervious to rust and - more important to me - very light. I'll be able to handle this trailer much like a launching dolly. 

When I placed the order for the trailer, Castlecraft happened to offer just at that time a spare tire and bearing buddies at no additional charge.

Good timing, why - Thank You!

I had been on their web site before and this offer had just popped up. The reason for ordering this trailer through Castlecraft rather than CLC was simply that Castlecraft did not charge for shipping which adds up for four rather large and heavy boxes shipped via UPS. Not that I would have minded to pay a bit extra to support a great company but in this case there was the additional savings on the extras and besides, in recent months I have kept CLC quite busy with orders for supplies.

I did follow the advice of  a fellow PMD builder in customizing the front part of the trailer. Instead of using the front end roller which came with the trailer kit, I ordered a little support bracket...


...which allowed me to install a 6" x 12" pad (which I made for this purpose) to provide front end support to the swooping curve of the hull.

Obviously, the exact location and height will need to be adjusted once the hull sits on the trailer. 

Oops!

Sticking it's lengthy tongue out in open air for the first time, it is discovered that a trip to the lake is - perhaps - premature.

Anyway, I still have a number of layers of varnish to do. Once that job is finished I'll have to clear the way out the door to move the hull onto the trailer.

Gudgeons, oarlocks, inspections ports and any other hardware will  be installed once it rests on its bunks.

Saturday, February 19, 2011

So that's why - duh!

As the hull of my emerging PMD was upside down to receive her pretty Hatteras-white bottom, I was pondering WHY I was so attracted to this particular design, a Norwegian Pram, as to choose it for my first boat-building project.

I really did not get it! The pear-shaped hull with its huge rocker would appear to make for a fairly slow-moving shape. Okay, the boat is light, so it should move readily without too much of a breeze. But why not build a Skerry or Northeastern Dory, two other CLC designs both of which have a sleeker hull shape with comparable flexibility of purpose?

Somewhere it did not make sense. I like fast sailboats - live slow, sail fast - you know?!

But then it finally hit me over the head like a ton of bricks - duh - and a FB friend already blurted it out - soon after I had realized what was actually going on! Let me show you some family pictures... those might explain a thing or two.


My grandfather was a musician, a performer, an instrument builder, a collector and an important promoter of Renaissance Music long before the term Early Music came in vogue. He was as much passionate artist as he was consummate artisan.

In his shop in Markneukirchen, he built recorders, harpsichords, clavichards, viols and - lutes. Right there on that picture which was the front cover of a brochure advertising his instruments, you can see my grandfather seated at a clavichord surrounded by his instruments. He oftentimes went on tour playing the lute, solo as well as accompanying songs by John Dowland and other Elizabethan composers. When I grew up, my grandfather made a huge impression on me. He was larger than life in many ways.

Now take a closer look at this instrument called lute.

Unless you already know something about this exquisite instrument these two pictures here don't exactly convey what I would like you to notice.

The voluptuous shape of the lute body consists of the sound board, the flat top of the instrument and the pear shaped "belly" or shell which is made up of many paper-thin ribs.


Here is a better view of the shell of the lute.

Mold to shape the ribs of a lute
To ensure a consistent shape, these wonderful curves of the ribs are constructed over a mold such as this one.  The delicate maple ribs of the lute shell (it's belly) fit together much like the strakes of this Norwegian Pram albeit minus epoxy.

Need I say more?

Here I thought that this nascent shipwright was on to something entirely new to him when - all along - he was merely retracing his way blind-folded back to impressions of  early childhood.

I was surrounded by these musical shapes from early on and evidently - unbeknownst to me - I needed to build a lute that floats - no strings attached.

So there you have it!

However, I have detected on occasions some interesting sounds as the drone of my orbial sander over the hull resonates hues of F# Major. I fully expect the dagger board to break out into song  once the little nutshell jumps on a plane - but it won't be a Galliard by John Dowland.

* * *

Here is a taste of the exquisite sounds of the lute... as played by the incomparable Paul O'Dette playing Downland Lachrimae Pavan and another example within a consort, John Dowland's Lachrimae Antiqua.

And here a short snippet if you want to learn a little about the lute.

Sunday, February 13, 2011

Ready or not - its time to varnish

Cleaned up and awaiting the first coat of varnish
As I am building the PMD I am discovering that perfection has limitations. It is not as though I don't see what could be done to get it just a tad better, cleaner - more prefect.

Yes, I see that tiny blemish. But you can take perfection only so far. After all, it's a boat that wants to be sailed and rowed.
 
No doubt, beginning with the first outing, the hull will collect little dings and bumps... (normal stuff) things that most onlookers won't even notice, except for when the beholder is the self-same one who erstwhile toiled over the higher degrees of flawlessness.

After first coat of varnish
So, I spent a day, cleaning up little spots - let's call them "items" -  which could probably be glossed over but they bothered me a tad too much and -  I was not prepared to forget about them.

In fact, there were a couple of items where I was appalled that they had escaped my attention previously. Finally though, time had arrived where the frog goes splish into the High Gloss Schooner Varnish.

Somehow I misunderstood the "foam" instruction to mean that the varnish was to be rolled on. I don't think that that was actually the case. In fact, I had already purchased an extra supply of foam rollers since I had run out of them on the third coat of paint. Well, I ended up brushing on the varnish. I'm sure I'll find a tiny spot here or there that I might have missed. No worries, there will be about 5 coats of varnish on this boat. [Since initially posting this entry, I received helpful info from CLC that I'll share in the next blog entry.]


We'll see how it goes with the second coat.

Once again, there will be obligatory sanding in between each coat, so I'll expect to be in this phase for some time. After that all that remains - more or less - are the peripherals, i.e. foils, spars, fittings and trailer. I have already started to work on the first two but have not yet ordered the trailer.

At this point I am reasonably confident that I'll get the PMD into water before April - provided that the ice on the lake has melted by then... thinking warm thoughts.