Sunday, April 10, 2011

Getting to know her

Today was a sailor's gift.

Temperatures reached 82 at the lake and winds started between 5 - 10 then soon provided a steady 10 with gusts to 15. A few hours later it was all white-caps for extended periods.

Did I mention that I headed up to Moraine State Park? Who would have guessed?

The little video clip of a nice broad reach as she is purring along quite nicely, don't you think?


You might say that I had an opportunity to take my little skiff  through her paces.

I am accustomed to boats whose bows slices the waves. This one goes up a hill and down a hill.

I am accustomed to boats that jump on a plane when they reach a certain speed. This boat seems to be planing before it even starts... albeit a "lightness of being" sort of plane.


Since the PMD has an exceedingly short water line, I suspect that under a number of circumstances, the boat might be faster with a second crew aboard since it would obviously lengthen the water line and thereby the hull speed.

So far, I have only single handed the boat.


Initially I expected more boat speed by simply heeling the boat since that would also lengthen its line on the water. However, from my limited experience so far, I did not find this to work the way I'd expect. The boat tracks better when sailed flat. Surely, the skegg has something to do with that result.

My preliminary conclusion:
The PMD offers a comfortable and relatively dry ride, even when "the sheep come out to graze".  I have no doubt that on most points of sail the gunter rig with jib will out-sail the lug-rig. Downwind is an altogether different story. On a broad reach and run, the balanced lug-rig soars.

If after a bit of sailing fun you wish to do a little rowing, you drop the spars, roll up the sail with spars and then pull out the mast and lay right on top of the sails, or the other side. Then you can row without the mast rocking

C-Lute is a lovely boat.

It's hard to think back now that in December I had only started to sand the bare wooden strakes.

Friday, April 8, 2011

What's in a name?

Okay, the question has been raised by many. I finally must divulge the name of what may be the obvious choice to the attentive reader of this blog.

However, before I invoke her name for the first time, a few words of affirmation are in order:

When I first decided on this design, I immediately said to myself ...I'll build her and she'll be called "in a nutshell". Hence the title of the blog. And a nutshell she is. However, I soon came to realize that other similar designs were in fact called "Nutshell" and thus this possible name seemed just too obvious.

So, Nutshell became strictly the "working title" and I hoped that her proper name would reveal itself in the process of building her.

When it became clear to me why I had chosen this perhaps less likely candidate over several of the other beautiful hybrid sailing/rowing designs offered by CLC as a kit, I resolved that the musical theme needed to be invoked by the name since I was, after all, building a "floating lute". Silly me!

My son Isaac suggested a name that I loved: No strings attached.

Upon further contemplation it seemed however simply incorrect since a sailing vessel does, in fact, have a few strings attached. Though they are not called so, try plucking the taut double-purchase downhaul on the boom (attached to the deck) and you'll get some resonance or two (to be sure) if not exactly a chord. So, strings are attached. Sorry Isaac!
 
Any lover of Renaissance or Baroque music will be familiar with wooden recorders being tuned generally either in C or F. Well, even though lutes generally have various tunings (to the best of my knowledge "C" not being one of them) my particular lute appears to be tuned most definitely in "C".

So, there you are: Her name shall be C-Lute ...my lute musing in the tune of seas.

And I understand that she is promising to strike up a few alluring sounds for anyone who sails her.

Ta-taaaah !!!

Thursday, April 7, 2011

Boat floats

Moraine State Park
April 7, 2011
YES!!!
She's not sinking... my boat floats.

Okay, I'm not exactly surprised. In fact, I fully expected that result. Even so, after these past four months of regular ship-wrighting, it was gratifying to witness a positive outcome.

It had been several weekends of horrendous weather in these parts combined with the effects of a serious cold which conspired to delay the much awaited test launch.


Today, finally, on the tail end of my cold but with a brief opening in the weather window, I hooked up the trailer after a shortened day at work and headed up to Moraine State Park.

My first stop was at the Park Office in order to purchase a launch permit. Let's not risk the Park Warden confiscating my little lug-rig on its first day at sea, shall we?

Temps at 58 with cotton-ball skies and winds between 5-7 knots, it turned out to be an ideal first outing for this little pram-pup.

I wanted this first day to be private without audience and outside of a gazillion water foul, I found myself unobserved, able to mess leisurely with all the details of getting ready and figuring out

what to put where

and attach how etc.

Of course, on the down side, no action pictures of boat and skipper under away. That's for another time.

The launch was a cinch!

The wheel hubs did not even have to touch the water. I slightly lifted the bow and that cause the skegg of the boat to slide off the trailer rear roller... and off she swooshed into the water.


The rounded shape of the hull (without human ballast on it) makes it appear as though it's only skimming the water like a swallow briefly dipping into the waves in flight.


After raising the lug sail, inserting the dagger board and securing the oars, I pushed off. True, not much wind is needed to make her move. However, movement is all relative, isn't it? On one hand, she heeled nicely on easy puffs and conveyed the lovely sense of speed. Yet, after ten minutes of sailing on the same beat, I find that our little lake has gotten a whole lot bigger when sailed in the little nutshell.

Of course, as I freely admitted in the opening post of this blog, I am accustomed to hi-speed action on my Johnson-18 which readily jumps on a plane and under asymmetrical spinnaker broad reaches easily clocks close to 20 knots. I have no doubt that even a Sunfish would sail rings around the pram - and most certainly Garth's Goldberry.

As I develop a more intimate knowledge of the sailing characteristics of this design and the balanced lug-rig, I will talk shop in more detail. In the meantime, let it be said that I simply love the way it feels sailing the boat. The gurgles of the wavelets against the lap-strake hull are music to my ears. And - I love the simplicity of the lug-rig.

And one wonderful surprise! I discovered that the boat - perhaps aided by the tan-bark lug-sail - appears to provide an excellent camouflage cover for birding. Water foul was not alarmed at the sight of an approaching nutshell, bobbing along nearby. I had brought along my binoculars and spotted two pair of Northern Shovelers... not exactly that common to see in Moraine State Park. As I kept my lenses peeled on the closer pair, I failed to realize in my fascination that I was getting exceedingly close to a flock of about 200 double-crested Cormorants until a couple of them drifted into my view.

What a sight! Obviously, at one point, one Cormorant cawed to the other: this is getting too close for comfort... and started the mass movement, 200 large black birds, flying very low and close around me. Jaw-dropping view! I was in awe.

It was time to return and while winds had been sufficient to work the lug-rig, half-way back to the dock, I decided to drop canvas and try rowing. Around the dock there is generally little to no wind as was the case today or fluky puffs from all directions.

Dropping the lug rig is a piece of cake and you can easily stow it on the side out of the way. So, out come the oars and off you go ~~~ tracking rather beautifully.

The pram is a hybrid craft - neither a pure sailboat nor a pure rowboat. Instead, it is an all-around little ship to mess around in. It does both things quite nicely as long as you don't have false expectations.

I much enjoyed rowing my little vessel back to shore and happily declare the first outing a success.

Monday, March 21, 2011

Ready at Last - Sails Included

After some 200 hours of toiling for three months and seven days, March 20th was the day on which I finally pronounced my little ship to be seaworthy and good to go.

Phew! No spring fling this little winter project would be!

Also: I am happy to report that the ice on Lake Arthur has vanished. Instead, hundreds of Buffleheads and Mergansers are frolicking on the lake. A great opportunity to do some birding of early migrants, don't you think? This coming week does not look promising but I am keeping my fingers crossed for next weekend.

I had fiddled around with rigging the down-haul but now have a nice arrangement with a double purchase. I may set up a cam cleat on the mast step but that can wait.

It did take me quite a while to figure out an elegant method of attaching the sail to the boom and yard.

John Harris, the designer of the PMD (and owner of CLC), had suggested that these spars would probably be attached in a semi-permanent way much like the sail of a sunfish.

In response to my question, he suggested using the reefing knot where the two ends would be capped with a half-hitch thereby preventing the relatively loose knot to get undone. With an 1/8" line this obviously will work well,  and look pretty tidy.


However, after messing around with the lug sail and spars in my basement for some time, I found that it was impossible to flake the sail nicely with both spars attached.

I wanted therefore to be able to detach sail from yard relatively easily. This would allow me to flake the sail along the still-attached boom and then roll it around the yard for sail-kindly storage. With that objective in mind, the proposed knot would not be convenient. Eventually I came up with a solution that looks quite neat, can easily be undone and seemed practical.

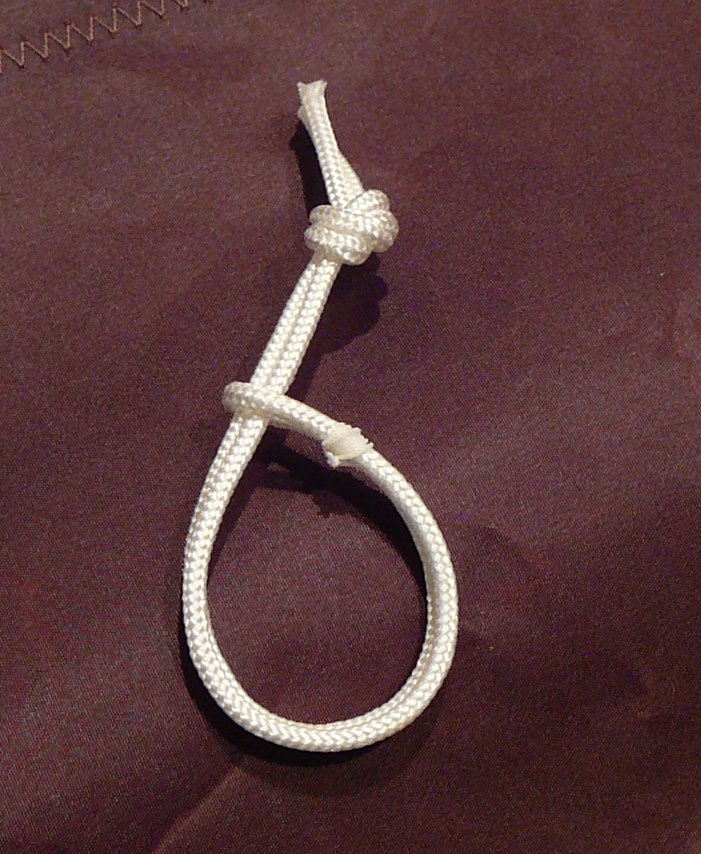
I started with 20" pieces of 1/8" Dacron cord.

 After cutting the pieces, I dipped the ends in Liquid Rope Whipping.

I then folded the line in half and tied some whipping twine as though it were the end of a rope.

The result was a loop in the middle of the line which could be opened and closed by slipping the twine up and down like a quasi-zipper. 

The two ends were then threaded together through the noose...


...and knotted with a twin half hitch.

The Liquid Rope Whipping kept the two ends together quite nicely.

Voila! All that needed to be done now was to "zip up" and pull the double half-hitch toward the noose.

The resulting ring could now easily be opened and closed and slipped through the cringle in the sail and around the spar.

*  *  *

As it turns out, I really only need to open about five rings on the yard - after that, the yard simply slips out of the remaining cord rings.

In part I had complicated my task a bit since I stitched leather around the parts of boom and yard  which intersect with the mast of this balanced lug rig. More on that and other lug rig specific items in a future blog.

*  *  *

Broad-reaching up my driveway - ready for some real action!
So now, all that is left to do is to secure the boat on the trailer for a safe and kindly ride. When I initially place the boat in its trailer bunks, I realized that the boat would tow with more stability, if the skegg would rest on the end roller. So now that this has been corrected, the boat sits firmly on the bunks without rocking.

Ready to launch!

Tuesday, March 15, 2011

Hatch Now - Launch Later

Even though visiting friends had admired the work in progress, I know that deep down they seriously doubted that I'd be able to transport the boat to the outside without tearing down a couple of walls.

Admittedly, as the parts came together the boat looked a lot larger than I had pictured. My friends' raised eye-brows caused me to remeasure the door way more than once.

But I had faith in the instructions which clearly stated the needed minimum dimensions of the exit in order to hatch this little duckling unscathed. Accordingly I should have room to spare.

The final coat was applied to the outside and though there are a couple of minor surface tasks any job here on out can be accomplished with the boat on the trailer.


So, this past Sunday I called up my friendly neighbor and neighborly friend John for a steel-nerved assist.

First we did a dry run and placed a floor mat where we needed to put down the boat in order to step down a small ledge.

Then we hoisted the boat out of its cocoon - cracked the shell, as it were - and slipped it through the door with an amazing amount of room to spare. Wow, that was easier than I thought. THANK YOU, Sir John!

Though the launching date is still some time away, the boat on its new trailer is starting to look rather shippy and salty, don't you think?

As soon as the vessel sat on its bunks, I grabbed the wooden mast to see if and how it fit in the mast step. After all, this was the first time I had sufficient air space to raise the mast. It's an excellent fit. I will craft a little wedge to ensure that the mast has no room to pump.

After I was done admiring the virgin state of my PMD and figuring when and how I would install the hardware, I returned to the sun room / workshop to clean up a bit.

Gosh - I almost felt a bit sad that the main work was finished now and that I would have to relinquish my little workshop to more mundane living.

Anyway, I'm not done yet and besides, soon there will be the fun of sailing or rowing it. I will wait for a reasonably warm day to hoist the sail and to install the horn cleats on the mast and some other arrangement to control the down haul. The kit did not come with anything in regard to the down-haul, so I'll have to draw upon my little sailing bag of tricks.

Next time a word about the lug rig.

Sunday, March 6, 2011

Satin Doll

As I began to think about the final look of my boat, I thought on one hand of the almost museum-quality creations of many fellow PMD builders as evidenced on their blogs and on the PMD Forum. In fact, my own vessel started to look like that after the fourth coat of varnish.

On the other hand, I considered the practical aspect of sailing and found the high gloss appearance not practical for two reasons: (1) I would anticipate that on the first heavy weather day it would scuff and scratch and (2) I thought that the super-smooth gloss would be too slippery with the first splash of water.

I was not even aware of the possibility of a finish other than the high-gloss varnish until I saw this picture which I came across as I was trying to figure out how my lug-rig components was intended to work.

I called CLC and yes, they do have another varnish BUT it does not offer UV protection. Therefore, you have to apply a minimum of three coats of the hi-gloss varnish before you can put on this other stuff.

As most of you know from conversations with your favorite house painters, the opposite of glossy is matte - (and yes, there is the dreaded semi-gloss but never mind that one.)  Not so in varnish terminology. I guess, matte sounds perhaps a bit too dreary for your average shipwright, no?

So, after five coats of high-gloss Schooner varnish...

First coat of Satin - with day light


...I am now applying Interlux Goldspar Satin. This is the varnish which will provide the finished look of the bright work, i.e. the entire inside of the boat as well as the top plank of the outside. I am planning on two coats - with you-know-what in between coats.

The foils will also shine in satin but I am not sure yet whether the mast, yard and boom will receive the same treatment.


Satin coat with artificial light
Instead of a shiny reflection of the high-gloss varnish, I am aiming for the amber glow of Okume wood - from within.

Heck! With enough coats of high gloss varnish you can make almost anything look pretty and sparkly but the sumptuous satin draws the eye below the surface and will only work on something that is worth looking at.


Besides -

this seems to make for a better contrast with the shiny Hatteras White of the lower strakes and rudder head, don't you think?!

Wednesday, March 2, 2011

Zen and the Art of Sanding

They say that 80% of boat building is sanding. Sounds about right to me.

The drone of the orbital (rotary) sander becomes quasi hypnotic. This was less so when I was working on the individual strakes, planks and other components prior to assembling the pram.

But now these components are formed literally into a sound chamber which amplifies the vibrations much like the body of a lute amplifies the oscillations of its strings.

The vibration transferred in the hands last long after the sander is turned off even though I've been working on a "light touch" and wear gloves. Also, I notice that in between coats of varnish the orbital seems to take off more varnish than it should - even at its slowest speed. . What to do?

Switch off the machine and go into manual mode. Okay!

After sanding the fourth coat and wipe off
It'll be slower going but quieter. I might even listen to some music. But wait - its all about focus on the task at hand - being in the moment, you know - concentrate but relax at the same time. So, hold the music.

Mindfulness is what the Buddhist monk, poet and Zen Master Thich Nhat Hanh calls it. In the Jewish Tradition this state of directed consciousness is known as kavanah. Rabbi Aryeh Kaplan explains that kavanah is clearing the mind of extraneous thought and concentrating totally on the action at hand.

A meditation on sanding then... breathe in - breathe out! (BTW: not so easy whilst wearing a breathing apparatus to avoid inhaling the micro-dust.)

With fifth coat of varnish applied
You sand the very same planks over and over again - much like washing dishes - you'll do it again tomorrow. Master Thich Nhat Hand advises: Do not try to hurry to get the job over with. Consider washing the dishes the most important thing in life. - Roger that!

Not much seems different from the last time you did it. You almost have to forget about outcome and simply enjoy the work without some immediate result or completion in mind.

As I sand I don't notice that I am bending my back in awkward ways. But when I stop sanding I ache. Breathe in - breathe out!

As I sand I don't notice that my hand and fingers are gripping the pad a tad too tight. But my finger joints complain about it when I finally rest. Breathe in - breathe out!

As I sand I don't notice that my arm moves more vigorously than might befit my age. But when I stop, my limbs demand that I come to my senses. Breathe in - breathe out!

I almost stopped counting time. I do know that the project tallies well north of 200 hours... but that includes tasks such as building the trailer

What is time when the task is timeless?  And how long exactly is NOW?