Sunday, February 27, 2011

Tow, tow, tow your boat

Alright then!
What will be rowed must first be towed.

Easier said than done.

First off, I had to make a decision: what kind of trailer should I get?

I actually have an old but trusty trailer for my MX-Ray. I am certain that it would work well for the PMD - should I used it? ...but then I AM planning to sell the MX-Ray and it'll be a lot easier to sell with a trailer which I customized to fit this hull like a glove. Besides, it's not exactly pretty  and I feel that a new boat would be a lot happier on a brand new trailer. Okay - that wasn't so hard, was it?

Some discussion about trailers on the PMD Forum provided excellent information.

Ultimately, I opted to buy the trailer that is specifically recommended by Chesapeake Light Craft even though, I have no doubt that a rather less expensive alternative would have done the job just as well.

It was the fact that the Trailex SUT-250-S is an all aluminum product which makes it impervious to rust and - more important to me - very light. I'll be able to handle this trailer much like a launching dolly. 

When I placed the order for the trailer, Castlecraft happened to offer just at that time a spare tire and bearing buddies at no additional charge.

Good timing, why - Thank You!

I had been on their web site before and this offer had just popped up. The reason for ordering this trailer through Castlecraft rather than CLC was simply that Castlecraft did not charge for shipping which adds up for four rather large and heavy boxes shipped via UPS. Not that I would have minded to pay a bit extra to support a great company but in this case there was the additional savings on the extras and besides, in recent months I have kept CLC quite busy with orders for supplies.

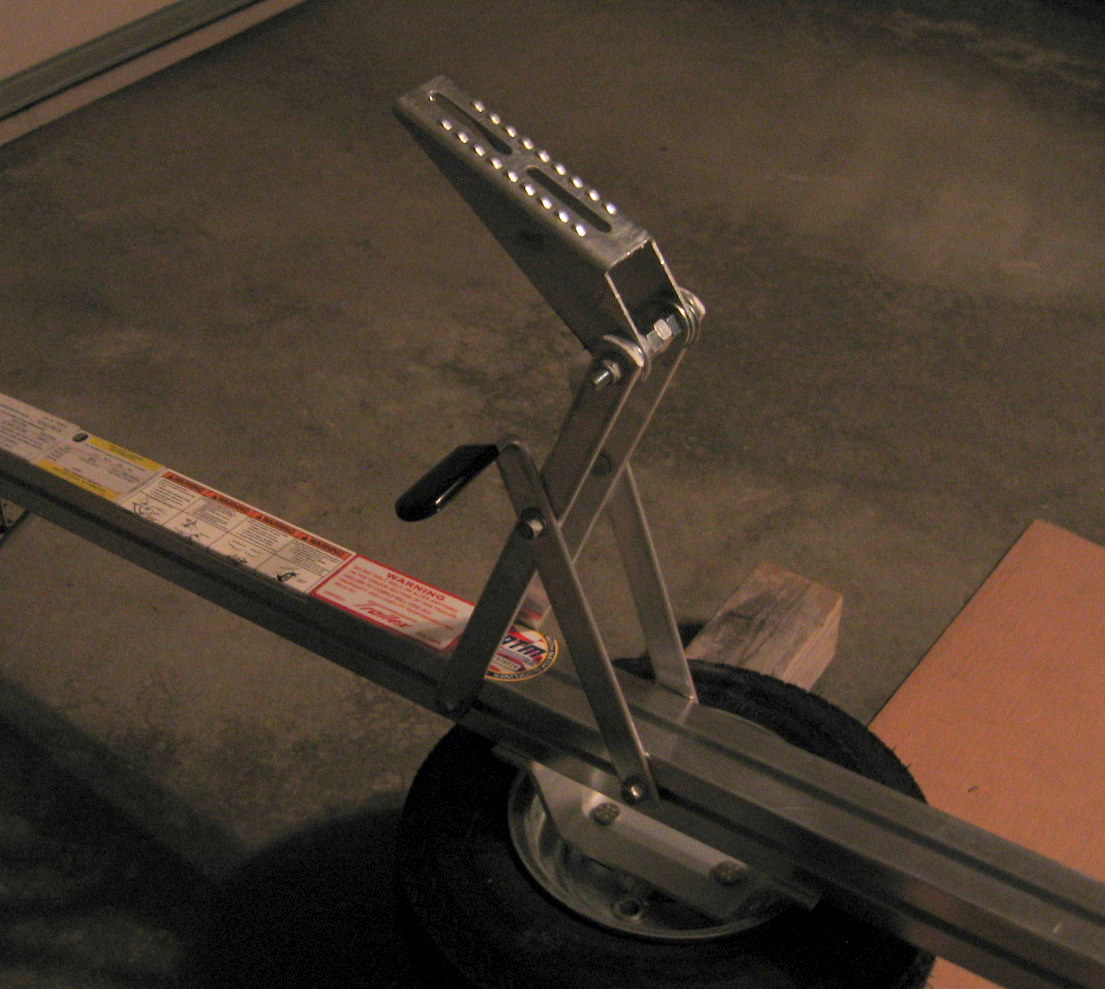
I did follow the advice of  a fellow PMD builder in customizing the front part of the trailer. Instead of using the front end roller which came with the trailer kit, I ordered a little support bracket...


...which allowed me to install a 6" x 12" pad (which I made for this purpose) to provide front end support to the swooping curve of the hull.

Obviously, the exact location and height will need to be adjusted once the hull sits on the trailer. 

Oops!

Sticking it's lengthy tongue out in open air for the first time, it is discovered that a trip to the lake is - perhaps - premature.

Anyway, I still have a number of layers of varnish to do. Once that job is finished I'll have to clear the way out the door to move the hull onto the trailer.

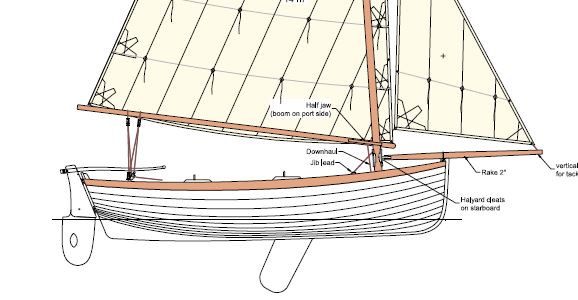
Gudgeons, oarlocks, inspections ports and any other hardware will  be installed once it rests on its bunks.

Saturday, February 19, 2011

So that's why - duh!

As the hull of my emerging PMD was upside down to receive her pretty Hatteras-white bottom, I was pondering WHY I was so attracted to this particular design, a Norwegian Pram, as to choose it for my first boat-building project.

I really did not get it! The pear-shaped hull with its huge rocker would appear to make for a fairly slow-moving shape. Okay, the boat is light, so it should move readily without too much of a breeze. But why not build a Skerry or Northeastern Dory, two other CLC designs both of which have a sleeker hull shape with comparable flexibility of purpose?

Somewhere it did not make sense. I like fast sailboats - live slow, sail fast - you know?!

But then it finally hit me over the head like a ton of bricks - duh - and a FB friend already blurted it out - soon after I had realized what was actually going on! Let me show you some family pictures... those might explain a thing or two.


My grandfather was a musician, a performer, an instrument builder, a collector and an important promoter of Renaissance Music long before the term Early Music came in vogue. He was as much passionate artist as he was consummate artisan.

In his shop in Markneukirchen, he built recorders, harpsichords, clavichards, viols and - lutes. Right there on that picture which was the front cover of a brochure advertising his instruments, you can see my grandfather seated at a clavichord surrounded by his instruments. He oftentimes went on tour playing the lute, solo as well as accompanying songs by John Dowland and other Elizabethan composers. When I grew up, my grandfather made a huge impression on me. He was larger than life in many ways.

Now take a closer look at this instrument called lute.

Unless you already know something about this exquisite instrument these two pictures here don't exactly convey what I would like you to notice.

The voluptuous shape of the lute body consists of the sound board, the flat top of the instrument and the pear shaped "belly" or shell which is made up of many paper-thin ribs.


Here is a better view of the shell of the lute.

Mold to shape the ribs of a lute
To ensure a consistent shape, these wonderful curves of the ribs are constructed over a mold such as this one.  The delicate maple ribs of the lute shell (it's belly) fit together much like the strakes of this Norwegian Pram albeit minus epoxy.

Need I say more?

Here I thought that this nascent shipwright was on to something entirely new to him when - all along - he was merely retracing his way blind-folded back to impressions of  early childhood.

I was surrounded by these musical shapes from early on and evidently - unbeknownst to me - I needed to build a lute that floats - no strings attached.

So there you have it!

However, I have detected on occasions some interesting sounds as the drone of my orbial sander over the hull resonates hues of F# Major. I fully expect the dagger board to break out into song  once the little nutshell jumps on a plane - but it won't be a Galliard by John Dowland.

* * *

Here is a taste of the exquisite sounds of the lute... as played by the incomparable Paul O'Dette playing Downland Lachrimae Pavan and another example within a consort, John Dowland's Lachrimae Antiqua.

And here a short snippet if you want to learn a little about the lute.

Sunday, February 13, 2011

Ready or not - its time to varnish

Cleaned up and awaiting the first coat of varnish
As I am building the PMD I am discovering that perfection has limitations. It is not as though I don't see what could be done to get it just a tad better, cleaner - more prefect.

Yes, I see that tiny blemish. But you can take perfection only so far. After all, it's a boat that wants to be sailed and rowed.
 
No doubt, beginning with the first outing, the hull will collect little dings and bumps... (normal stuff) things that most onlookers won't even notice, except for when the beholder is the self-same one who erstwhile toiled over the higher degrees of flawlessness.

After first coat of varnish
So, I spent a day, cleaning up little spots - let's call them "items" -  which could probably be glossed over but they bothered me a tad too much and -  I was not prepared to forget about them.

In fact, there were a couple of items where I was appalled that they had escaped my attention previously. Finally though, time had arrived where the frog goes splish into the High Gloss Schooner Varnish.

Somehow I misunderstood the "foam" instruction to mean that the varnish was to be rolled on. I don't think that that was actually the case. In fact, I had already purchased an extra supply of foam rollers since I had run out of them on the third coat of paint. Well, I ended up brushing on the varnish. I'm sure I'll find a tiny spot here or there that I might have missed. No worries, there will be about 5 coats of varnish on this boat. [Since initially posting this entry, I received helpful info from CLC that I'll share in the next blog entry.]


We'll see how it goes with the second coat.

Once again, there will be obligatory sanding in between each coat, so I'll expect to be in this phase for some time. After that all that remains - more or less - are the peripherals, i.e. foils, spars, fittings and trailer. I have already started to work on the first two but have not yet ordered the trailer.

At this point I am reasonably confident that I'll get the PMD into water before April - provided that the ice on the lake has melted by then... thinking warm thoughts.

Friday, February 11, 2011

Row your boat - Intermezzo

Okay, I might have called it an "Interlude" but I'm a musician by birth so Italian it is, what can I say...

I'll trust you'll agree that the time waiting while paint was curing (before it could be sanded) could be spent a lot better than just watching it dry. Much like watching grass grow, it is not a very constructive activity. Besides, this being a winter project, I am intending for the boat and all main components to be ready for launch by March 21 lest my project turn into a spring fling.

I was actually quite concerned about this particular task since I have never done any needle work. Circumstances demand that this would-be shipwright learn a new trick.

The task?

Make traditional leather oar collars.

Rather than purchasing a set of those cheesy plastic oar locks, I opted for the leather route and purchase a kit in order to construct salty-looking oar locks. The kit came with tiny bronze nails. These were to be nailed into the oar to keep the leather in place.

I did not like that solution and decided that I needed to find the proper waxed Dacron twine, a leather hole punch and take a crash course in Herringbone stitching.(of sorts).

YouTube served up some reasonable directions and CLC provided a good link for some basics. For example, I learned that if you want an nice tight fit, you have to soak the leather, let it stretch, measure the proper width but then trim it 1/8" shorter so that you can tighten up the stitches for a perfect fit.

I could easily see myself procrastinating on such a task. But the thought of letting time go a-wasting while serious paint was drying caused me to take the plunge into leather.

As you can see, the actual oar locks have to be on the oar before nailing in the collar into position because once that is done it will prevent the oar locks from slipping off.

I am pleased with the tight fit of the leather and the overall appearance. I started out with some mink oil but will provide regular tallow treatments for the protection of the collars.

Thursday, February 10, 2011

Skin Deep

On to the outside shell of my project boat: Having prepped the inside, we once again flipped the hull - with expert neighborly help - for the dermatology phase: applying the external skin.

Come to think of it, much of the time and effort already has revolved around making the surface of the wooden planks sea-worthy with ultra-thin layers of an epoxy seal.

Basically, it was sanding with 120 grit and 220 grit,

...then lay on the prime coat,

The primer CLC provided was battleship gray and I doubted that it was the right one. The pictures in the manual did not show a gray primer. However, I emailed and quickly got the response that, indeed, it was the correct primer.
...then sand some more,

(Note: sanding battleship-gray primer was quite a mess but luckily, the paint was not readily airborne so it was more of a dirt rather than a dust issue.)

...then apply first coat of paint,

(Note: I had selected Hatteras Off-White for the outside except for the top plank which will be varnished.)

...and sand with 220 grit,

...then apply the second coat
and sand 220 grit  - AGAIN!

...then apply third coat.


Sounds pretty straight forward and it was.

I admit that I'm pleased with the contrast of the creamy color and the okume wood veneer.


I am considering one additional coat of paint but will probably wait until the bright work is finished.
This combination of paint and "bright wood" (varnished) appears to be one of the more popular ones for this boat design and it is easy to see why.


Obviously, during this process there were hours of waiting for the paint to dry and cure before each coat could be sanded.

Coming up: what I did whilst waiting...

Also, as I was gazing at (and sweating over) the hull upside down, it all of a sudden became crystal clear to me why it was this particular boat that so much struck my fancy. It was in my genes. I'll explain...

Thursday, February 3, 2011

Department of Interior

It's a messy,
a dusty,
a tedious,
a frustrating and at times
awkward-contortionist type of thing...

working on the interior of the PMD.

But then there is relief and satisfaction in giving birth to a tubby little craft AND getting the job done - well, more or less. 

Aside from the rub rails, the knees had to be fitted and glued.

I actually had to work quite a bit on these two pieces - sanding that is - before they fit snugly into their respective corners. Then the motor pad on the transom needed the epoxy and sanding treatment prior to getting installed. I had also subjected both knees to that same treatment prior to installation.

So after the rub rails were glued on, they needed to be sanded, rounded and trimmed.

I opted for a nice taper toward the bow. Aside from the somewhat intimidating experience of working with a super-sharp and elegantly flexible Japanese saw, this amazing tool got me off to a good start.  The first "bite" was a bit scary but the shark-toothed blade sank through the relatively hard wood like soft flesh. WOW! Power at your fingertips, this tool - not unlike a Samurai sword - could inflict some serious harm!


This act of courage was then followed by more prosaic
rasping,
shaping,
and a by now familiar routine of 
sanding 120 grid
sanding 220 grid
epoxy coating 1,
sanding,
epoxy-coating 2,
sanding...

I think you get the picture
Oar Lock dry fitting
 
 ...and then fitted for the oar lock risers


 If you have followed this blog from the beginning, you may recall that the very first thing the manual instructed us to do was to glue together the rail scarfs and put them aside. Here a picture of the rub rail at the point where the scarfs meet.

Lug rig mast step


I decided to install the mast step as part of this phase of construction.

It made most sense to do it at this point so that I could subsequently seal the bottom at the next turning of the hull.

Ready for the 220 grid treatment


So, prior to turning the hull back around, I needed to sand every surface, every corner, nook and crevice that will be eventually varnished.  220 grid being the order of the day.

As I started the process, I found quite a few unexpected bumps - especially on the undersides of the seats - which had escaped my attention when it would have been much easier to fix.... and now required special effort and attention.

I am happy to report that this inside job has now been concluded - phewww!